How to Set Up a Rootless GitHub Container Building Pipeline
04:29:2024
BY Michael Crank
When developing containerized applications for government customers, certain security and software requirements must be taken into consideration. The government tries to move toward Red Hat’s Universal Base Images (UBIs) to ensure the security of containers. While UBIs can be built on non-Red Hat operating systems, doing so limits your choice of packages. At SealingTech, we found ourselves in need of other packages beyond what a non-Red Hat system could provide.
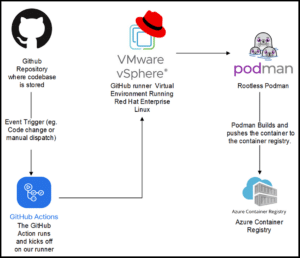
An overview of the completed pipeline in use
We also faced issues when using a Jenkins server, including difficulty of setup and it being a plugin-based ecosystem. If one of its plugins broke, the entire workflow collapsed. Switching to GitHub Actions over other well-established services simplified integration allowing us to use our existing code repositories. Code commits, meaning changes to your code repository, can also be configured to trigger automation such as cutting a release or making updates to individual containers.
Building Red Hat UBI images with ease in an offline environment
To run workflows, GitHub offers cloud-hosted runners for Ubuntu Linux, Windows, and macOS operating systems. For our requirements, we built on Red Hat based systems, and therefore were unable to use GitHub’s runners. We instead employed a self-hosted runner. Among its benefits, a self-hosted runner can be configured to pull images from a container registry requiring authentication, such as the DoD’s Platform One Iron Bank.
Through this blog, you’ll learn how to create a full CI/CD pipeline capable of building UBI containers in GitHub; see how to set up a rootless self-hosted GitHub runner, establish a container registry, and understand how to make a GitHub action to orchestrate the building process.
Configure your GitHub runner
First, set up either a virtual or hardware system configured with the Red Hat Enterprise Linux (RHEL) distribution of your choice. We used a virtual machine on our vCenter virtual environment with 4 cpus, 8gb ram, and 350gb of storage. Next, install Podman.
sudo yum install podman
For new RHEL installs, be sure to attach a subscription license to gain full functionality when building your UBI images. Learn more here.
Go rootless for added security
Documentation exists on GitHub’s website for setting up self-hosted runners, but not on how to run Docker containers without granting them full root privileges on the host system. Hence, making them “rootless.” We opted to do it rootless as an added security measure for our virtual machine, where GitHub can only access non-privileged accounts on our system. The rest of this tutorial will work with a normal privileged account, however if you wish to do it rootless, I will show how to do that here. Note: this process requires organization admin rights. See how to add a self-hosted runner.
To create a rootless runner, a few modifications to the process need to occur, which we’ll review. As a root user, you’ll need to create a new user. For this demonstration, we called ours GitHub.
useradd github
Next, create a new folder and put it in the opt directory.
cd /opt
mkdir actions-runner; cd actions-runner
Follow the GitHub directions to download and extract the runner in this folder. Note: the versions on this command may vary so use the latest one in the link.
curl -o actions-runner-linux-x64-{currentversion}.tar.gz -L https://github.com/actions/runner/releases/download/{currentversion}./actions-runner-linux-x64-{currentversion}.tar.gz

tar xzf ./actions-runner-linux-x64-{currentversion}.tar.gz
Next, run the runner configuration script shown below inputting your organization’s name and unique token. To make this rootless, change user to the GitHub user we previously made and run the configuration step.
su - github

./config.sh --url https://github.com/{YOUR_ORGINIZATION} --token {YOUR_TOKEN}

exit
You’ve successfully launched the configuration script. Next, name the runner and assign it to a runner group. The runner group gets added later to your script so you can access it. This script will ask if you want to add any labels to the runner, which is useful if you have multiple runners. It will inquire which folder you want to set as your “work” folder. I recommend the default.
Install the runner with the following command:
./svc.sh install github
This will appear:
Creating launch runner in /etc/systemd/system/actions.runner.{ORGANIZATION}.{RUNNERNAME}.service
Run the following to start and enable the runner:
systemctl start actions.runner.{ORGINIZATION}.{RUNNERNAME}.service
systemctl enable actions.runner.{ORGANIZATION}.{RUNNERNAME}.service
Check the status of the runner.
systemctl status actions.runner.{ORGINIZATION}.{RUNNERNAME}.service
The output should look like this:
actions.runner. {ORGINIZATION}.{RUNNERNAME}.service - GitHub Actions Runner ({ORGINIZATION}.{RUNNERNAME})
   Loaded: loaded (/etc/systemd/system/actions.runner. {ORGINIZATION}.{RUNNERNAME}.service; enabled; vendor preset: disabled)
   Active: active (running) since Tue 2024-03-12 07:26:23 EDT; 2 weeks 0 days ago
 Main PID: 1145 (runsvc.sh)
    Tasks: 20 (limit: 48813)
   Memory: 890.2M
   CGroup: /system.slice/{ORGINIZATION}.{RUNNERNAME}
           ├─1145 /bin/bash /opt/actions-runner/runsvc.sh
           ├─1160 ./externals/node16/bin/node ./bin/RunnerService.js
           └─1281 /opt/actions-runner/bin/Runner.Listener run --startuptype service
Focus mainly on this line:
Active: active (running) since . . .
With the service running, this completes the configuration of the rootless Github runner.
Create a Yaml workflow file
A Yaml file contains the instructions for the runner to complete its task. The path for this in your GitHub repository looks like: your_repo/.github/workflows/example.yaml. The entire code snippet for the workflow file reads:
name: Example Image Builder
on:
  workflow_dispatch:
  push:
    paths:
      - example_folder/**
jobs:
  build:
    #Specify Runner Group
    runs-on:
      group: self-hosted-runner
    name: Build and Push image
    steps:
        #checkout repository from github
      - name: Checkout repository
        uses: actions/checkout@v3
        #connect to container registry
      - name: Log into registry
        uses: azure/docker-login@v1
        with:
          login-server: development.azurecr.us
          username: ${{ secrets.USERNAME }}
          password: ${{ secrets.PASSWORD }}
        #build and push the container
      - name: Build & Push
        run: |
          cd /opt/actions-runner/_work/repo/example_folder
          podman build . -t placeholder
          podman tag placeholder development.azurecr.us/example_folder
:$GITHUB_REF_NAME-${{ github.run_number }}
          podman push development.azurecr.us/example_folder
:$GITHUB_REF_NAME-${{ github.run_number }}
Triggering the workflow
To start the workflow file, decide if you want this pipeline automated. If so, determine how the workflow will be triggered whether manually, via an update of the container, or triggering it upon release. See more options here. The automation potential is endless. For now, I’ll design the trigger to run when an update is made to the folder containing the Dockerfile as well as manually.
on:
  workflow_dispatch:
  push:
    paths:
      - example_folder/**
The on: is what defines what triggers the workflow. The workflow_dispatch: portion allows for a manual trigger of the workflow. The push: part of this code tells the workflow to run when any file is updated in the example_folder.
Selecting the runner group
In the workflow file, it’s time to name the runner group that you setup in the configuration script into this line of the workflow file. This informs GitHub to run the workflow on your self-hosted machine.
runs-on:
group: YOUR_RHEL_VM_RUNNER_GROUP
Configure the container registry of your choice
If you are using a registry that will work with the podman login provided in this template, add the respective secrets to your GitHub repository for that section to run. You might need to use a different login action, such as the one below if you’re using azure or encounter problems with the podman login action. For our implementation, we chose an azure container registry, and we used the azure docker login action to sign in to the registry within our runner.
     - name: Log into registry
        uses: azure/docker-login@v1
        with:
          login-server: example.azurecr.us
          username: ${{ secrets.USERNAME }}
          password: ${{ secrets.PASSWORD }}
Using the organization secrets here, we logged into the container registry to allow us to push up images later.
Build and push the container
- name: Build & Push
        run: |
          cd /opt/actions-runner/_work/repo/example_folder
          podman build . -t placeholder
          podman tag placeholder example.azurecr.us /example_folder:$GITHUB_REF_NAME-${{ github.run_number }}
          podman push development.azurecr.us/example_folder:$GITHUB_REF_NAME-${{ github.run_number }}
I use the run module to open a shell on the GitHub runner. Next, I input the cd command to move into the directory of the dockerfile, then run it. I tag it with the branch name (using the GitHub variable $ GITHUB_REF_NAME) and the workflow run number (using the GitHub variable –${{ github.run_number }}) this will produce an image tagged example_folder:branchname-123. You can adjust versioning here however you like by tagging it differently.
Rapid customer prototype development
Integrating these steps into your workflow allows you to build UBI images in your offline environment using an automated process that’s easier than other CI/CD pipeline options—saving you time and headaches. On GitHub, you also get unlimited storage for your repositories. It’s also a larger and well-known community of open-source developers. At SealingTech, we utilize this process to help us meet the diverse and mission-critical needs of our government customers. It has become especially essential in the rapid development of new containers deployed in our TSA compliant Cyber-Fly-Away Kits.
Interested in learning more? Connect with one of our team members today.
Related Articles
Transforming Cyber Challenges into Real-World Customer Solutions
Intuitive and skilled problem solvers, SealingTech engineers design and build defensive cyber solutions for challenging and unpredictable environments where critical missions are at stake. They tackle issues that directly impact…
How Geopolitics Defines Cybersecurity for Critical Infrastructure
Geopolitics and cybersecurity increasingly converge. State-sponsored hackers target critical infrastructure as part of broader international competition. Governments use cyber operations for espionage, influence, and sabotage to apply pressure without kinetic…
Could your news use a jolt?
Find out what’s happening across the cyber landscape every month with The Lightning Report.
Be privy to the latest trends and evolutions, along with strategies to safeguard your government agency or enterprise from cyber threats. Subscribe now.